Printer Test Page is one way to determine if your printer is faulty. Usually, when one is having doubts about the performance of a printer, this test is conducted. It is the first thing to do in order to clear those doubts.
After you have printed a test page, you would probably see what is wrong. Sometimes, it could be a particular program that is causing a problem with the printer.
However, a printer test page would help to streamline your diagnosis. When you are unable to print from a program, but the printer test page works, that tells that there is absolutely no problem with the printer.
Overview
I wanted to print some documents from a third-party app one time on my PC. But it wasn’t working. My first response was to try the printer test page. After doing the test, I discovered that the problem was with the application I was using, not the printer itself.
Once the cause of the printing problem has been identified, it takes you one step closer to the solution.
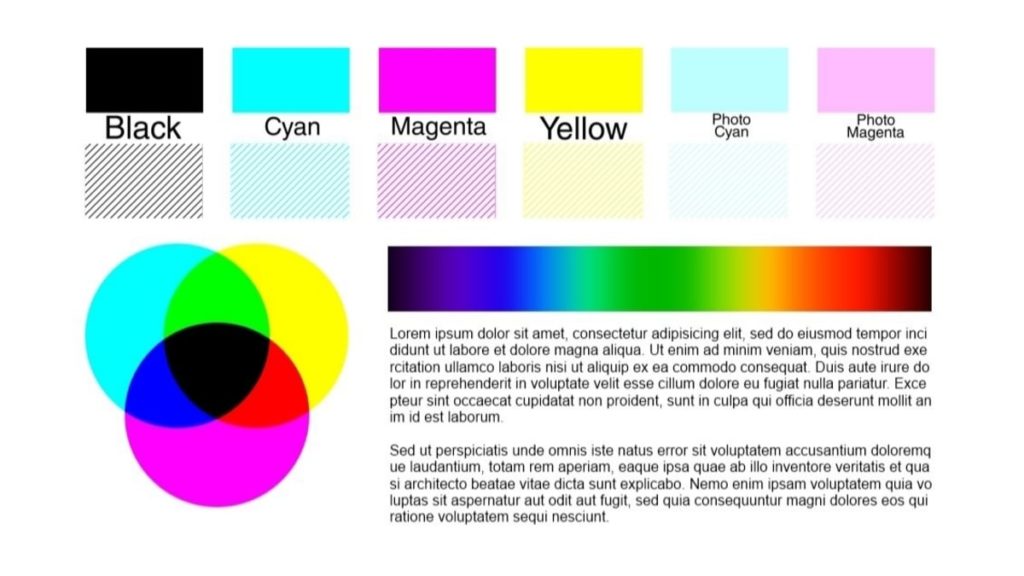
You can decide to print; either a color test page or a black and white test page. Also, if you are using a black and white printer, you obviously shouldn’t be expecting a color test page.
How to Perform a Printer Test Page
There are several methods to perform a printer test page, depending on the operating system and the version of your computer. We would be looking at the various methods for printing test pages on commonly used Windows OS and Mac OS computers.
Windows 10
To print a test page on Windows 10, here are some simple steps to follow;
Step 1: Search for “Printer“
On the Windows Search, you can search for “Printer.”
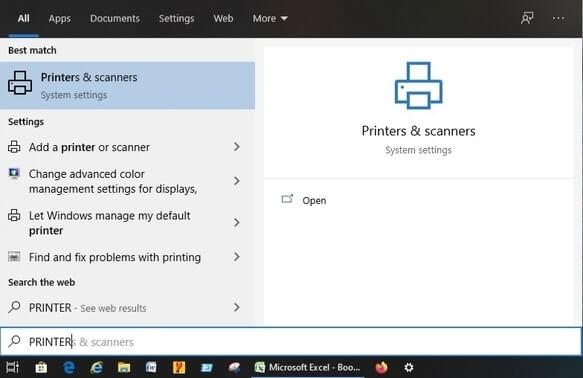
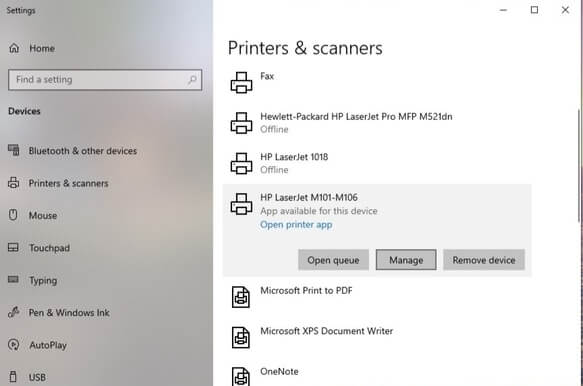
Step 2: Select Printers & scanners
From the search results, select Printers & scanners.
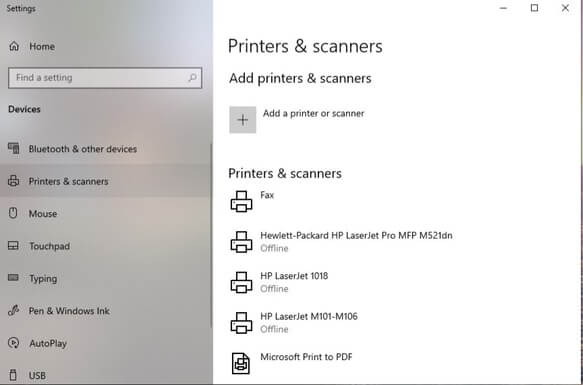
Step 3: Click on Manage
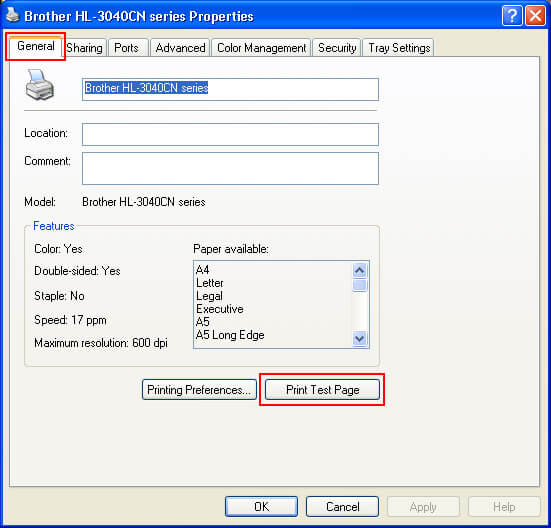
After selecting the connected Printer from the right sidebar, click on Manage.
Step 4: Select Print a test page
In the following page, you can pick Print a test page.
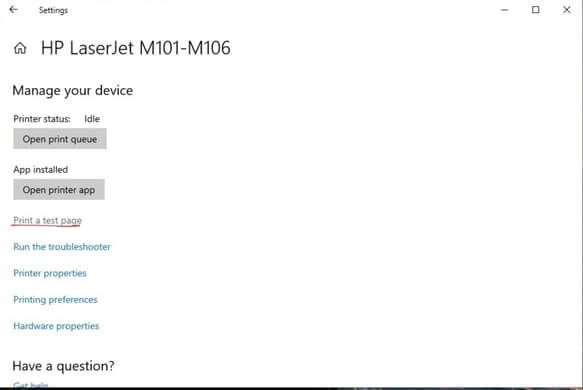
After selecting the Print a test page option, you would be able to print a color test page, if you have color printer.
Alternatively, you can head to Windows Settings, and select Devices, then Printer & scanners. You can find Printer & scanners on the left sidebar in the Windows Settings.
Windows 8 (8.1)
To print a test page on Windows 8 (8.1), here are some simple steps to follow:
Step 1: Navigate to Windows Search bar
You have to navigate to Windows Search, by either clicking the Windows key on the keyboard, or clicking on the lower left corner of the screen.
Step 2: Type “printer”
Once you have found the Search, simply type “printer”, and results would appear automatically.
Step 3: Click on Settings
Select Settings from the results displayed.
Step 4: Select View Devices and Printers
Step 5: Right-click on the Printer icon
Right-click on the Printer icon and choose Printer Properties.
Step 6: Click the Print Test Page button
Click the Print Test Page button that is found on the lower right of the dialogue.
Windows 7
To print a test page on Windows 7, here are some simple steps to follow:
Step 1: Click the START button
You have to click the START button on the keyboard or towards the lower left corner of the screen.
Step 2: Go to Control Panel
Select Control Panel from the options displayed.
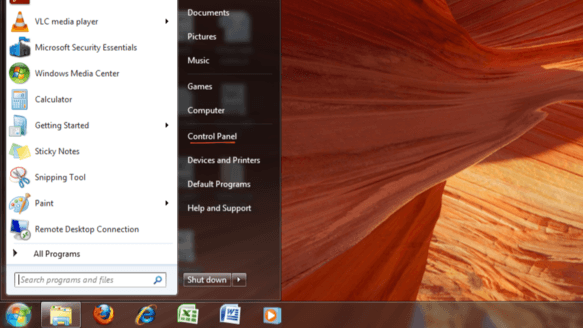
Step 3: Select Devices and Printers
You would have to click on the Devices and Printers option.
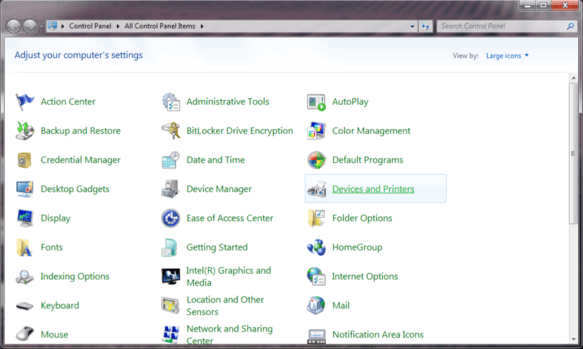
Step 4: Right-click on the printer icon
Right-click on the printer icon after locating it, and choose Printer Properties.
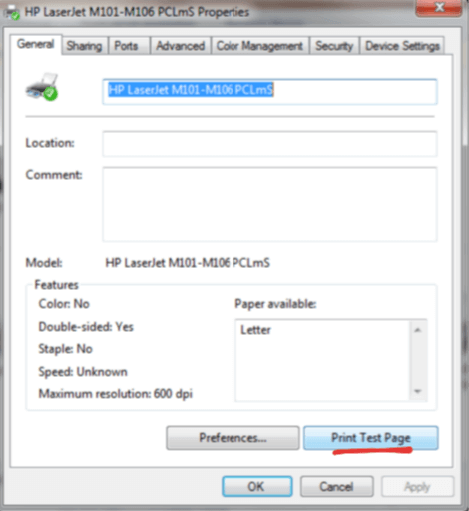
Step 5: Click the Print Test Page button
Click the Print Test Page button that is found on the lower right of the dialogue.
Windows Vista & XP
To print a test page on Windows Vista and Windows XP, here are some simple steps to follow:
Step 1: Click the START button
You have to click the START button.
Step 2: Go to Control Panel
Choose Control Panel from the options displayed.
Step 3: Select Devices and Printers
Double-click the Devices and Printers option.
Step 4: Right click on the printer icon
Right click on the printer icon after locating it, and choose Printer Properties.
Step 5: Click the Print Test Page button
Click the Print Test Page button that is found on the lower right of the dialogue.
When the test page has been printed, you can then click Close.
Note: The method for printing a test page on Windows Vista and Windows XP are similar. If you follow the steps above, you should be able to perform a printer test page on Windows Vista or XP.
Printer Test Page on Mac OS

To print a test page on Mac OS, here are some simple steps to follow:
Step 1: Open the Apple Menu
You need to open Apple Menu and click on System Preferences button.
Step 2: Click on Print & Fax
Click on Print & Fax and select the model of your printer.
Step 3: Select Open Print Queue
Select Open Print Queue and then run a Printer Test Page.
We have covered several ways you can perform a printer test page from Windows 10 to lower versions. We have also included a way you can print a test page on Mac OS. If you followed all the steps accurately, we are certain your test page will be printed successfully. By so doing, you would be able to identify what is wrong with your printer.
Test Page Settings
You may edit the printer test page settings before running the test. You can simply calibrate the colors in the setting, and that would determine the color of the prints. As mentioned earlier, you can print in color or gray scale (black and white).
You can also adjust the lining or thickness of the output. While in the settings, you have to select the right paper size for the test page to fit. The paper size selected should be of same size with that in the printer feeder.
Printing a Test Page Online
Print a test page online by using some online tools. There are some website pages that allows you to test your printers by printing a test page online.
This is usually available for A4 Printer test pages. In order to print a test page online, you simply have to open an image file from a supported website, and then right click the print button.
Apple, Canon, Epson, HP, Samsung and Windows printers work with online test pages. It’s simple to perform and you’re just one-click away from printing a test page.
What if a Printer Fails to Print?
There are instances where a printer would be unable to print a test page. We don’t want rule the possibility out completely. It may be problems in your connection or printer set up. It may also be that there are some drivers that are not properly installed. If the problem persists, you have to check your connections and drivers.
Printing a Test Page Without Using a PC
On the surface of some printers, you would find a menu to run a self test. With such functions, you can print a test page without even connecting to a computer. And you can also able to run some diagnosis independently.
So check your computers if it has this self test mode. You could also go through your printer manual, it will be mentioned if there are any self test features available.
Keynote
From the various methods considered, you would agree with me that running a printer test page involves clicking on a series of buttons. Yeah, it requires a functional keyboard and mouse.
When Printer Test Page Fails Because of Drivers
Even when the printer contains a self test feature, there are a few instances where it may not work with a computer or a connected device. However, that would most likely be a software problem or a connection problem. Make sure you do not have an outdated driver, faulty cable, and so on.
There are several drivers pack out there that may be compatible with your computer to fix the driver problem. You can identify if it’s a drivers problem by troubleshooting. Drivers can also be found by updating on Device Manager, if you are using a Windows computer.
After updating your computer drivers, you can try to conduct a printer test page again. If the test page is printed successfully, that would mean that the problem with the drivers have been resolved.
When you are certain that there’s nothing wrong with the drivers, cables, or the computer. You can contact a technician in order to address the problem. It may be that the printer has some technical issues.
Final Note
Personally, printing a test page have been very helpful to me. When I wanted to print a project work I did some time ago, I had to print a test page first. Imagine printing an entire project work only to discover that there are problems with the color palette or ink levels.
When you print a test page, it shows the ink or toner levels. So when it says that the ink level is low, and you have an important document you want to print, it would be best to replace the ink immediately. Even so, if you wish to, you can simply run the ink till it’s empty.
Whatever your version of operating system or computer is, you can run a printer test page from settings or control panel. It runs automatically. Whether your printer supports wireless printing or not, the similar method applies. Please note that most modern printers, including HP printers have print test page feature on them.

Zerofy Editorial is a team of writers determined to provide evergreen content to millions of readers worldwide.


This is really helpful. I have joined your feed and look forward to seeing more of your post. Also, I’ve shared your website on my social networks.